Diving deep into sentiment analysis
The sentiment analysis task is quite easy because we can leverage TextBlob, which has already been imported. So, let’s start with the very poor code we have, which, at the moment, just prints a subheading on the screen:

Figure 6.11: Sentiment Analysis section
Currently, when we select Sentiment Analysis from our web application menu, we just get a subheading and some white space below it.

Figure 6.12: Sentiment Analysis starting point
Let us start by creating a text area, since we need somewhere to add the text we want to analyze in order to extract its sentiment. Adding a text_area now is really quite simple for us:

Figure 6.13: A text_area for Sentiment Analysis
This is the result of the preceding change on the browser side:

Figure 6.14: The text area in the browser
Now, we can type something in the text area and store it in a variable named, once again, raw_data.
As usual, a great option we have is to add a button – we can call it, for example, Evaluate – in order to perform our analysis. Since the text area could be empty, we also have to add a check on the raw_text length, and in case of missing text, we can print a warning message.
This is a simple example of the code that we can use:
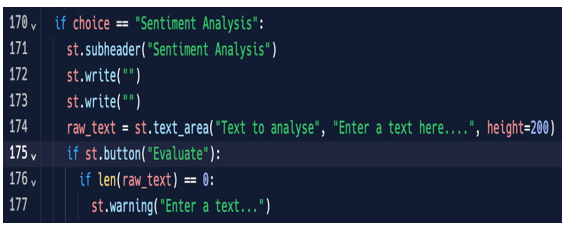
Figure 6.15: Evaluate button and check of raw_text length
If raw_text is not empty, we can use TextBlob to create a blob object. After that, we can use the blob’s sentiment method to get the sentiment of the text we just wrote, and at the end, we can write it on the screen. Here is the code:
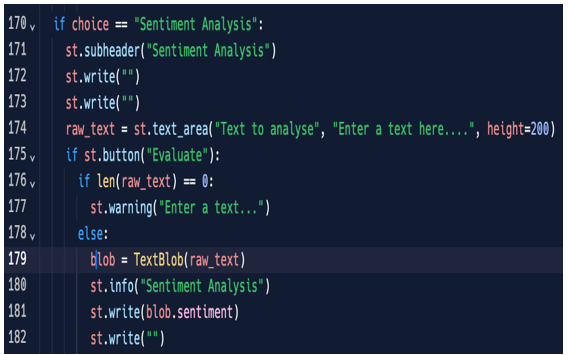
Figure 6.16: The sentiment method provided by TextBlob
Figures 6.17 and 6.18 show the result of the latest code modification in the browser.
The first case is positive sentiment, since the polarity is very high.
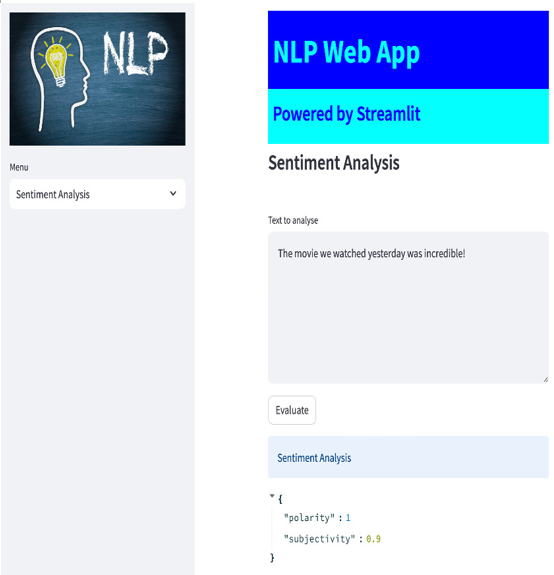
Figure 6.17: An example of positive sentiment
The second case is negative sentiment, based on the rather low polarity.
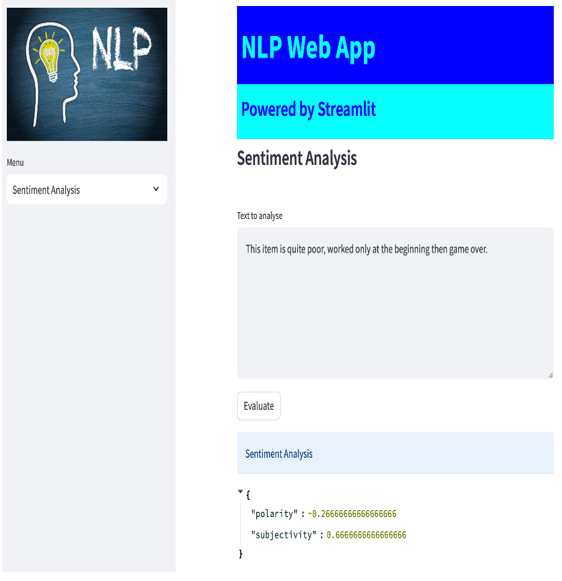
Figure 6.18: An example of negative sentiment
In Figure 6.19, we can see the warning that appears when the Evaluate button is clicked, but there is no text to be considered.

Figure 6.19: Enter a text… warning
As we can see, the TextBlob’s sentiment analysis returns two values: polarity and subjectivity. Let’s look in a little bit more detail at the meaning of these terms:
- Polarity is the real sentiment, with a value that goes from –1 up to +1. Specifically, -1 indicates very negative sentiment, +1 indicates very positive sentiment, and all values around 0 are generally considered neutral outcomes.
- Subjectivity can have values from 0 up to 1. Values around 0 are very objective results, while values around 1 are very subjective ones.
So, for a sentence such as I loved that movie, it’s really great!, we get a result like the following:

Figure 6.20: High polarity and high subjectivity
The movie received a high polarity score of 0.85 and a high subjectivity score due to the use of the first-person pronoun in I loved. This indicates a highly subjective opinion. Let’s write something different, such as the following:
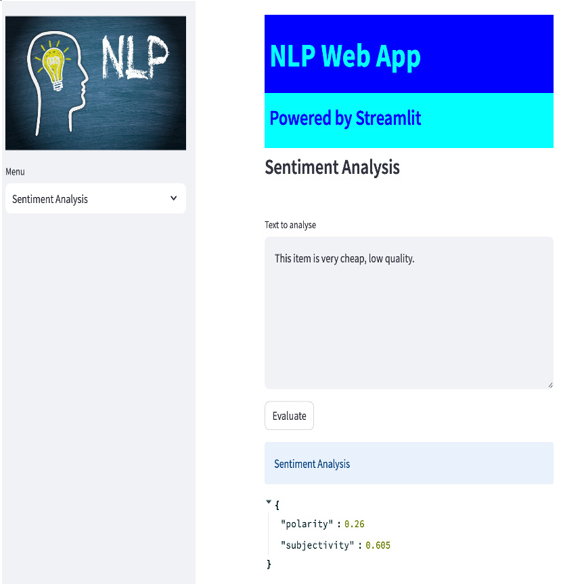
Figure 6.21: Neutral sentiment
The polarity of our statement is 0.26, indicating neutrality since we presented a factual statement. The subjectivity is almost balanced since facts hold personal and universal perspectives.
And that’s all! Our first web application is really finished! We implemented all the tasks we defined at the beginning using just Python, pure Python, and some free libraries!
Let’s take some time to recap what we have done so far.
