Creating customized web apps to improve user experience
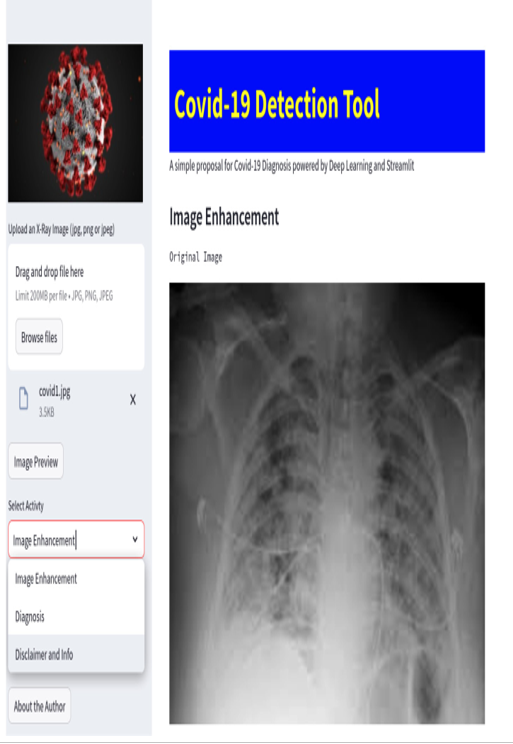
Now, it’s time to complete our Covid-19 Detection Tool web application. So far, we have implemented several features, such as Image Enhancement and Disclaimer and Info, but we are still missing the Diagnosis section. Figure 10.1 shows what we have completed so far:

Figure 10.1: The Covid-19 Detection Tool web app we’ve developed so far
As I mentioned in Chapter 9, the task of Diagnosis is to understand from a picture, specifically from an X-ray of the chest, whether or not a patient has Covid-19.
This kind of prediction can be performed using a pretrained AI model, which in our case is a convolutional neural network (CNN). A CNN is a neural network with a peculiar structure or shape that performs very well regarding tasks related to computer vision. Computer vision, in a few words, means to make computers understand what’s going on with a picture, its content, the objects represented inside it, and so on.
So, let’s see how it is possible to use a pretrained AI model inside Streamlit to perform, in this case, a computer vision task, but more generally, a prediction.
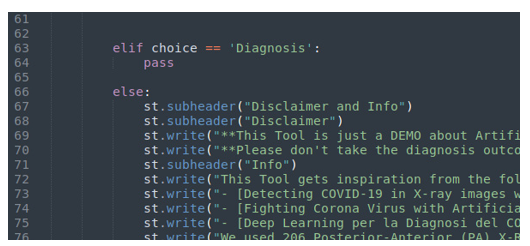
We need to start from the point where we stopped in Chapter 9: the if clause related to the Diagnosis voice of the menu, as shown in the following figure:

Figure 10.2: The “Diagnosis” voice of the menu
The first step is to add a button in the sidebar. In this way, when the user clicks on this button (its label will be Diagnosis), the tool will perform a binary classification while leveraging the pretrained model to predict whether or not the X-ray image represents a case of Covid-19.
Adding the button, as we know, is very easy – it’s just a matter of typing the following immediately after choice==’Diagnosis’:
if st.sidebar.button(‘Diagnosis’):
The CNN we are going to use was trained with black and white images. So, first of all, when the user clicks on the Diagnosis button, the X-ray image must be converted into a black and white image. However, the image – the original X-ray image before the black and white transformation – must be converted into an array (because this is the format we need to manipulate images). We are lucky since this operation is very simple when using numpy, a library that we’ve already imported. The three lines of code we need are as follows:
new_img = np.array(our_image.convert(‘RGB’))
new_img = cv2.cvtColor(new_img, 1) #0 is original, 1 is grayscale
Gray = cv2.cvtColor(new_img, cv2.COLOR_BGR2GRAY)
The code in the first line changes the image into an array, the second line converts the image into a grayscale domain, and the final one converts it into a pure black and white image. Please note that we are leveraging cv2, the Python library for computer vision that was imported at the beginning of the file.
This black and white image is saved in a variable named gray.
